Bruno Elan Stair Lift Installation: A Practical Step-by-Step Guide
Installing a Bruno Elan stair lift is a methodical process that typically takes a certified technician two to three hours. While the unit arrives pre-assembled at the factory, proper rail fitting and electrical setup are critical for safe long-term operation. This guide walks through each phase, from site prep to final safety checks, so owners know exactly what to expect on installation day.
What Prep Work Should Homeowners Complete Before Installation?
Before the technician arrives, clear the staircase entirely—remove rugs, runner carpets, pet beds, and any loose objects. The Elan track mounts to the stair treads, not the wall, so wall décor can stay. Ensure the chosen power outlet (a standard 240V UK socket within 1.2 meters of either the top or bottom landing) is accessible. If the outlet is farther away, a licensed electrician may need to run a new spur. Also measure your doorways: confirm the delivery team can bring the rail sections (each roughly 1.8 meters) into the home without disassembling door frames. Most standard UK hallways accommodate these lengths, but narrow Victorians occasionally need a minor door removal.
We recommend a final check of the Bruno Elan track customization options you selected. Confirm the rail measurement form matches the actual staircase—a 35-degree straight run versus a 45-degree tight turn requires different bracket positioning. Have your order paperwork and warranty card ready for the technician to sign off.
How Is the Rail Track Measured and Cut On-Site?
The installer begins by laying the pre-assembled rail sections along the staircase to verify the exact fit. For straight stairs, the rail comes in continuous lengths up to 12 metres; for curved models, sections are matched to the custom template. The technician marks each mounting bracket location on the stair treads, usually two brackets per tread for spans over 60 cm. Using a digital level, they ensure the rail rests at a 6-degree pitch (the Elan’s standard angle) so the carriage remains perfectly level during travel. If the staircase has a mid-landing, the rail segments are joined with a stainless steel splice plate torqued to 35 Nm. The rail is then secured with M8 bolts into the treads, using 10 mm deep pilot holes to prevent splitting. No wall fasteners are used, making relocation relatively straightforward.
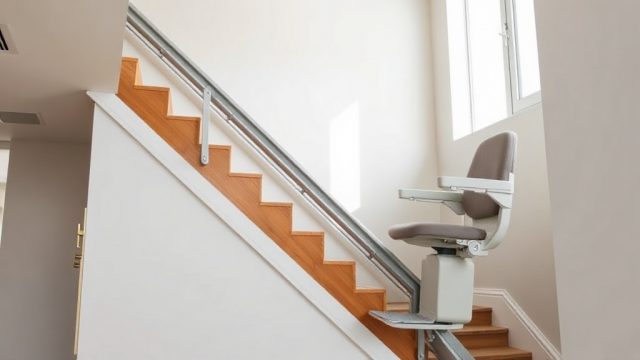
What Happens During the Carriage and Seat Installation?
Once the rail is fixed, the technician carries the Bruno Elan carriage to the top of the stairs for balance. The carriage glides onto the rail’s pinion system—no ratchet rails to line up. The seat, which is a separate piece in the box, attaches to the carriage base via four quick-release bolts; a typical install takes 15 minutes. The armrests snap into place with spring-loaded pins, and the footrest unfolds and locks with a deadbolt mechanism. The seat rotates manually 90 degrees at both ends for easier entry and exit. The technician tests the manual swivel lock twice: a distinct click confirms proper engagement. The 2.4 Ah lithium-ion battery pack is inserted into the carriage compartment, and the control joystick (located on the right armrest) is wirelessly paired with the base station. A full charge takes 4.5 hours from the wall adapter.
During this phase, the installer also configures the Bruno Elan battery life test parameters—ensuring the auto-park feature engages after 90 seconds of inactivity to preserve charge. You’ll receive a printed card with your serial number and expected charge cycle count (rated for 500 full cycles).
Which Electrical and Safety Checks Are Performed?
The final part of installation focuses on safety verification. The technician plugs the wall adapter into the outlet and leaves it connected for at least two hours before first use (a full initial charge is recommended). They test the carriage’s two independent braking systems: the electromechanical brake engages automatically when power cuts, and the manual emergency stop cord halts the carriage mid-rail within 0.15 seconds at full speed. Each test is logged. The safety sensors at the front of the footrest and the underside of the seat are triggered with a soft foam block—the carriage must reverse direction immediately upon contact. The technician also verifies the seatbelt tension (adjustable to 18-25 kg of pull force) and confirms the obstruction sensors detect any object down to 15 mm thickness along the rail path. Below is a severity reference for common issues found during checks:
| Observation | Severity Level |
|---|---|
| Battery LED flashes red 3 times | Needs attention soon – recharge or replace battery |
| Emergency stop cord does not cause immediate halt | Needs attention soon – inspect cord tension or brake assembly |
| Footrest does not fold fully or wobbles >3 mm | Usually not urgent – tighten hinge bolt at next service |
| Seat rotation feels stiff or grinds | Needs attention soon – lubricate swivel mechanism |
| Wall adapter gets hot to touch (>50°C after 1 hour) | Needs attention soon – replace adapter unit |
| Carriage noise above 55 dB during travel | Usually not urgent – check rail for debris, schedule service if persists |
All checks are documented on a sign-off sheet. The technician will also set the two remote call stations (one at top, one at bottom) into their wall brackets and test the wireless range—typically 30 metres in a standard house. Bruno Elan pricing and warranty details are reviewed at this point, including the two-year parts and labour cover.
How Is the Owner Trained on Daily Use?
Training takes roughly 30 minutes. The installer demonstrates how to call the lift from either level using the remote fob or the wall station. You’ll practice boarding: stand in front of the seat, press the call button to bring the carriage to your level, rotate the seat open, sit down, close the footrest with your foot, and fasten the lap belt. The joystick requires a light push forward for ascent or backward for descent; releasing it stops the carriage immediately. The technician shows you how to manually rotate the seat at the top landing (push the lever down and rotate), how to fold the footrest and armrests for compact storage, and how to engage the manual release on the carriage (a red lever under the seat) if power fails. They also explain cleaning the rail with a damp cloth and lubricating the pinion track every six months with the provided silicone spray. You’re given a quick-reference card with troubleshooting codes and a reminder to avoid overloading the 127 kg weight capacity.
What Do Owners Say About the Installation Experience?
Comments from recent buyers highlight the minimal disruption. One owner noted, “The whole process took just over two hours, and the installer swept up every single drill chip. I was very surprised—the lift was ready to use that evening.” Another mentioned the clear communication: “They called an hour before arrival, and the rail fit perfectly with no modifications to my 1930s terrace stairs. The training part was thorough, not just a five-minute demo.” A third shared a practical tip: “I had the technician leave the wall adapter on a different floor outlet than the one nearest the stairs, because I wanted the lift to be chargeable from the upstairs landing as well. They were happy to do it—just a longer cord.” These real-world experiences suggest the standard installation process meets expectations for cleanliness and efficiency. For those still evaluating, the Bruno Elan track customization options received praise for fitting non-standard turns, though owners stress that on-site measurements take a full hour if the template was not prepared in advance.
Frequently Asked Questions
How long does the Bruno Elan installation typically take?
For a straight staircase, installation takes between 1.5 to 2 hours. Curved or multi-landing setups require 2.5 to 3 hours because of additional rail splicing and calibration. These times assume no electrical work is needed beyond plugging into an existing outlet.
Do I need an electrician to prepare a dedicated circuit?
Generally no—the Elan runs off a standard 240V socket and draws less than 15W during charging. However, if your preferred location is an older round-pin socket or there is no outlet within 1.5 metres of the rail ends, hire a qualified electrician to install a new spur. The installer can advise on location during the pre-install survey.
Will the rail damage my staircase or carpet?
The rail mounts via bolts into the treads, not adhesive. On carpeted stairs, a small patch of carpet at each bolt hole is cut out (a 12 mm circle) and the bolt head sits flush. On hardwood treads, a pilot hole protects material integrity. If you remove the lift in the future, the holes can be filled with wood plugs; the carper holes are typically hidden by the pile, especially with medium-pile carpets.
Can I install the Bruno Elan myself to save money?
Factory policy requires professional installation to validate the warranty. Self-installation voids the two-year parts and labour cover. The unit’s rail alignment and safety check procedures demand tools and calibration (like a torque wrench and digital level) not typical in a DIY household kit. Most owners find the £199 (for straight) to £349 (for curved) installation fee worthwhile given the warranty protection and safety assurance.
What happens if the rail is too long for my stairs?
Straight rails are cut to length on-site using an angle grinder; the cut end is capped with a plastic endpiece. Curved rails are custom-made to the template, so trimming is rarely needed. The technician will always confirm the exact length before cutting—no waste beyond the standard 10 cm overage built into each rail kit.
Is the installation noisy or disruptive to neighbours?
Drilling pilot holes generates moderate noise for about 10 minutes total. The angle grinder (used only if trimming) runs for under 30 seconds. Most homeowners schedule the install during daytime hours; apartments with thin walls should inform neighbours in advance. The technician will lay drop cloths along the stairway to catch dust and debris, and will vacuum thoroughly afterwards.